

One of the fastest ways to through out the proportions on your dry fly is to blow out your hackle measurements. Of course tying in a tail that is twice the body length will get you there pretty quick too. When working with dry fly feathers, it is important to make sure that we have the right feather for the task at hand. That is where is become so important to start using your hackle gauge.
We’ve already touched on the differences between various dry fly hackle feather in a recent article. There I discussed the differences between capes and saddles, with plenty of reference to feather size. So, I though it prudent to look at how to correctly measure you feathers for each application.
The hook
It all starts with the hook. As we well know, fly tying hooks come in a range of sizes. These can be as big as 8/0 or as tiny as a #30. What that all means I a topic for another blog. For the easy of this article I am going to remain within a narrow size range in my examples. We’ll just talk about sizes #10 through to #16. So, your hook is sized to according to it’s gape. The bigger the gape, the larger the hook. So it makes sense that as the gape, and subsequently the shank, increase in size, so should all the materials applies to achieve a consistent balance.
The gauge
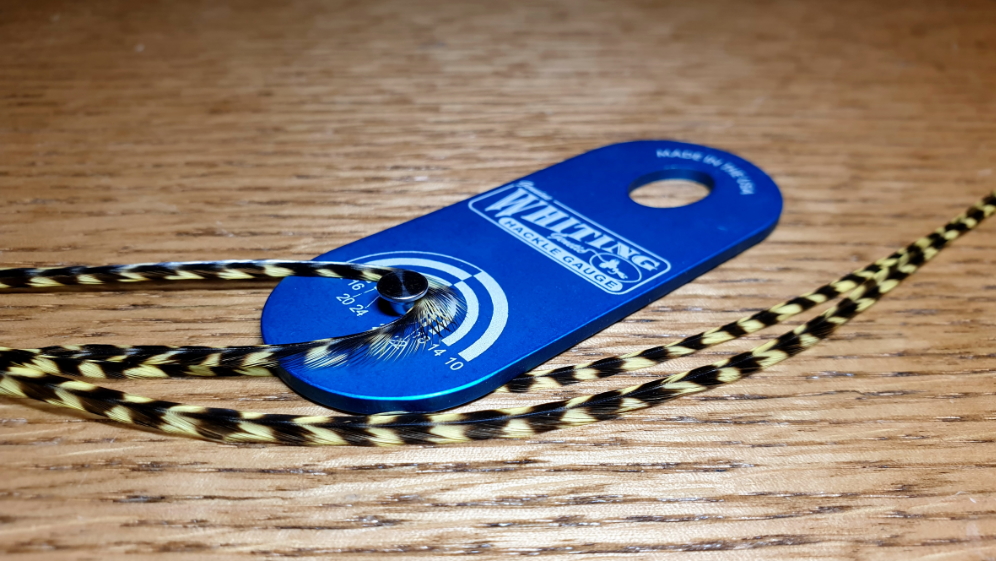
That’s where the hackle gauge comes in handy. It’s a simple enough design, that makes measuring hackle sizes a breeze. Your feather is wrapped around the post so that the barbs extend perpendicular to it’s axis and show up against the measurements that surround it. Usually two wraps around the post is a good idea to get an accurate reading of your feather. This avoids any broken fibers giving a low size reading. From here you can easily separate your feathers into batches to work with if you are that organised. I prefer to leave them on the saddle until I find the one I need and then pluck it off.
So, a size #12 feather as measured on the hackle gauge should then balance out nicely with a size #12 hook. When wrapped around the hook shank, the fibers will extend to the width of the hook gape. That makes sense, and seems all very simple. Unfortunately is isn’t always as black and white with hackles. And no, I’m not talking about natural grizzly. For it is rare that we find ourselves wrapping directly to the hook shank with no material between the feather and the shank.

The real measurement
Stop and think about it for a moment. As you add more material to your hook shank, it gets thicker. Well, that’s obvious. So, as you wrap your feather around it, the fibers are starting further out from the shank, meaning they extend further too. Suddenly your carefully measure #14 feather looks like a #10 when it goes onto your foam wrapped body and your fly looks like it had a growth spurt that went wrong.
With this in mind, a secondary measurement is always a good option when choosing your feather, Gently run it around the fly at the tie-in position before binding it down and check how that hackle looks. If it’s going to throw the balance out, step down a size, or perhaps two. After all, the tying police are not going to kick your door down for using a #14 hackle on a #10 hook. There are no rules that demand you adhere to this sort of conformity. But simply logic suggests a better balanced fly will deliver you more confidence when fishing it. Which results in better fishing and more fish.
Going sideways
Other considerations need to be accounted for when tying parachute flies. As your hackle now wraps around the post, and not the shank, the gape measurement isn’t that important. More so, you want your hackle to be balanced out with the fly’s body length, matched up to the shank. A general rule of thumb here is to go up two sizes from the gape measurement for your hackle. That gives you a nice spread on the parachute and balances the fly nicely. But again, the thickness of your post needs to be taken into account here.
Using some synthetic materials, it is possible to have a very thin, highly visible parachute post. This does not add a lot of bulk to tie-in point for the hackle. But if you use foam, calf body hair or deer hair for instance, that post suddenly becomes a lit more cumbersome. This can result in a fly that gets lost under a massive hackle parachute. So again, taking the measurement with you hackle gauge will find a feather that will get you close. But wrapping it around the post before tying git in will really allow you to see how the finished silhouette will come present.
The long and the short of it is that the final image needs to look right to your eyes. I’m sure you’ll see plenty of flies on social media outlets that look a little off. Then plenty that just look right. And this all starts with the right balance in the materials’ size. It becomes very difficult to achieve a good result when you start out with materials that just don’t match up. So, getting yourself a quality hackle gauge is the best starting point.


Leave A Comment
You must be logged in to post a comment.